
LESSON PLAN: The Blues Scale
Objective
Students will be able to take a solo over a blues, a minor key, or a major key using a pitch collection (scale) that allows for fast fingerings and great mobility across the keyboard.
Resources
Jam Card 5b (Blues Scale)
Procedures
- Demonstrate how easy it is to play a C Major blues scale. Although these are the same notes used in the typical A blues scale, we recommend
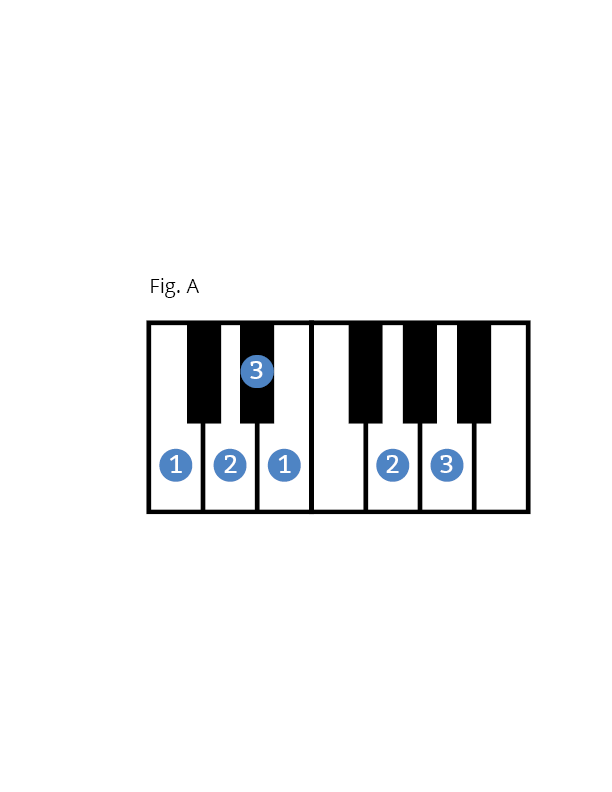 starting on the note C because of how easy the fingering is to explain. When this scale begins on a C it is sometimes called the “C Major Blues Scale” or the “Country Music Scale”. Unfortunately there isn’t a standard name for it when it’s used in a major key as often as this happens. Regardless, play the thumb(1) on C, index (2) on D, middle (3) on Eb, then cross the thumb under the middle finger to put it on E, followed by index (2) on G, and finally middle (3) on A. This fingering makes playing this scale REALLY FAST once you get used to it. This “C Major Blues Scale” can be played so much faster than a C pentatonic scale because of the way that having the extra note (Eb) fits under the hand. Guitarists say the exact same thing about using the blues scale on guitar—the extra note gives you more to grab on to and go faster when you want (Figure A).
- Coach students on playing
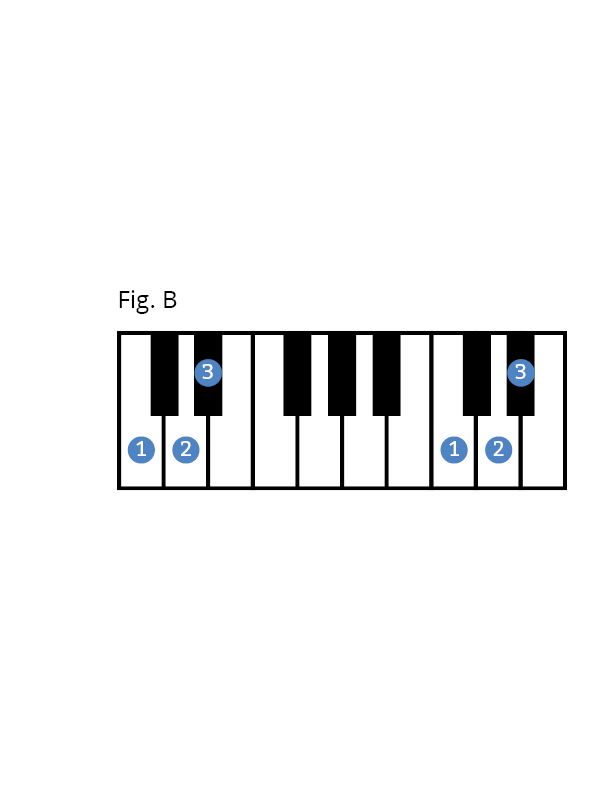 this scale one “finger group” at a time. In other words, have everyone play the C, D and Eb (1, 2, and 3 fingers) in different octaves of the keyboard. This way they get used to finding C in any octave and instantly know how the other fingers and notes relate to that “finger group”. Practice with this group of notes in an ascending order up the keyboard (C, D, and Eb) and then a descending order down the keyboard (Eb, D, and C using the fingering order 3, 2, and 1). Pairing students into groups to help each other is always a good idea with new skills like this (Figure B).
- After the students have the first “finger group”, begin to work on the second without making any attempt to link them together yet. They’re just going to play E, G, and A with fingers 1, 2, and 3. Repeat the same procedure used in teaching the first finger group, having them play ascending and descending all over the keyboard (Figure C).
- Teach the thumb crossing.
 This means that when they’re playing this scale in an ascending order, after the 3 finger plays the Eb the thumb will reach under the hand to play the next note E. Now the fingers are in position to play the next finger group! (see lesson plan “Teaching Thumb Crossings in scales”).
- Now they’re ready to play the descending version of the scale. Play 3, 2, and 1 on A, G, and E. Next have the 3 finger cross over the thumb to play the Eb. Now the fingers are lined up to the first finger group.
National Core Arts Standards (Music)
Anchor Standard 1: Generate and conceptualize artistic ideas and work. Example: General Music MU:CR1.1.2 a. Improvise rhythmic and melodic patterns and musical ideas for a specific purpose.Anchor Standard 5: Develop and refine artistic techniques for presentation.Example: General Music MU:Pr5.1.2 b. Rehearse, identify, and apply strategies to address interpretive, performance, and technical challenges of music. Common Core Correlations: CCSS.ELA-LITERACY.RST.6-8.3 Follow precisely a multistep procedure when carrying out experiments, taking measurements, or performing technical tasks. Visualize relationships between two-dimensional and three-dimensional objects: CCSS.MATH.CONTENT.HSG.GMD.B.4 Identify the shapes of two-dimensional cross-sections of three-dimensional objects, and identify three-dimensional objects generated by rotations of two-dimensional objects. (Images of piano keyboard and chord shapes)